Sunday, June 23, 2013

Colonial Guitar Progress and New Ukulele Build!

Carbon Fiber Supports


    Carbon fiber is a wonderful material, and over the years I have come to love working with it in all of my builds. It has a structure similar to wood in many ways, and carries sound like wood does yet is stronger and lighter than wood. There really is no down side to using carbon fiber in key places that need the added stiffness and support without adding any real weight.
    In the picture above I have begun to add the carbon fiber to the bridge plate and the upper bout. When I am finished there will be carbon strips in all the key points along the sides of the guitar protecting both the upper and lower bouts and adding stiffness to the entire instrument which enhances to sustain. I get all of my carbon fiber products from dragon plate, a high modulus military grade supplier of carbon fiber products. I will also use some braided carbon fiber rods to support the neck block, I have found that doing this helps keep the action of the guitar true in diverse climate conditions.
    You can see that the soundboard and sides have been mated together finally, I assemble all my guitars and ukuleles in the classical style, soundboard first. There is in my mind no better way to fine tune the soundboard than to do it with the sides attached. The majority of tuning is done before assembly but with the back off I can fine tune the soundboard to the sides much easier allowing for a better relationship between those components most closely related to one another. I make my backs stiff, but slightly responsive as well. They however do not need to be tuned as the soundboard does and I can easily adjust the sound of the back by thinning it slightly after attaching it.
    The scale length, stiffness of the top and the size of strings used as well as the expected style of playing are all taken into consideration when tuning a guitar top. There are many great luthiers who have delved into this in great detail I would suggest reading Ervin Somogyi the responsive guitar, it will begin your journey into that crazy world of soundboard dynamics but if you are like me and can never stop learning, it is only the tip of the iceberg.
    Needless to say I have come a long ways in my journey of lutherie and I will forever be learning, because I know we should never grow to old to learn.

Tail Graft Inlay


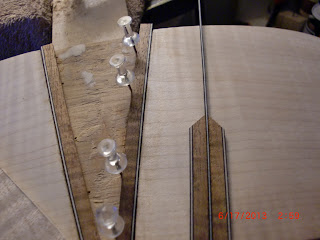
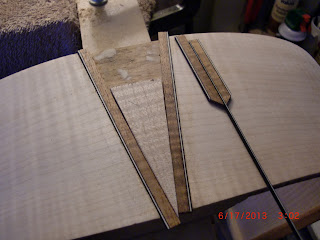
    I thought I would show you how the tail graft inlay was coming along. Staying with the Colonial theme I wanted to add a Native American aspect to the guitar, hence the arrow head motif. Using the Curly KOA, Flamed Maple, Ebony and BWB wood purfling strips as well as some Spruce the design emulates some Native American art that I have studied.
    Sometimes I work from a predesigned idea, but with the Colonial guitar I am moving as I am inspired, following where my heart and soul take me, believing in the beauty of the theme and the art. It is a very exhilarating experience to say the least.

    I am excited to announce that we will be starting another blog along side this one very soon! A customer from New Zealand has commissioned a themed concert ukulele that will be designed around the Maori culture. I will be trying to keep track of both builds as they unfold. Stay tuned exciting things to come! Check out the build here
http://maoriconcertukulele.blogspot.com/2013/06/the-maori-themed-concert-ukulele.html

Don't forget to visit our website www.vallisguitars.com
for information on custom guitars please contact sales@vallisguitars.com

Wednesday, June 19, 2013

Wood River but chisel review

    I have a love hate relationship with chisels and suffice to say as I have grown in my craft that relationship has changed several times over the years. I have owned chisels from the old stand by blue chips to the more expensive Swiss made Pfeils and everything in between. I love the Swiss chisels but in all honesty they are often too large for what I do, so I went in search of a set of bench chisels to fill a niche in some of the processes of lutherie. I searched high and low for a decent set and almost bought another set of Pfeils when I came across these Wood River but chisels and decided to give them a try. What follows is my personal impression of these chisels.

Nice little wood box

    First off I will say the wood storage box is a nice touch, could it be better? sure but it isn't a bad box for the price you pay for these chisels. I look at it as a free accessory, and as such my only real downward mark on the box is the clasp that holds it shut. Keep in mind I am a perfectionist and this box and the clasp are fine and the clasp does what it is intended to do, which is to keep the box closed, it is just on the cheaper side of clasps. That being said I was happy with the box itself and it closes nicely and the chisels do not move around at all when it is closed. Storage box gets 4 stars from me, and with a nicer clasp it would be a 5.

Blade edge out of the box

    I decided to take some pictures of the blade right out of the box with no lapping or sharpening and to be perfectly honest the edge is not bad at all. it has a nice taper and though the bevel may not fit into the tightest of corners, it is fine for what I do.

Nice blade backs

    The backs are very uniform on these right from the manufacturer and mine have a nice slightly concave bevel just behind the edge, much like a fine Japanese chisel. When I do hone and flatten these I expect amazing things for such a well priced set of chisels.

Slight convexity

    It was nearly impossible to photograph the convexity, but using my Starret combination square with an accuracy or around .0001 I can just see a slight bit of light through the back of the chisel right behind the edge. At the edge itself it appears to be perfectly flat but I always flatten the backs of my chisels before serious use anyway.

Beautiful bubinga handles

    One of my favorite parts on these chisels are the stunning bubinga handles. They are finished nicely and fit in the hand so perfectly you can almost forget you are even holding them. In my tests I did do some light tapping on the back with a soft faced mallet and they held up just fine. Lets face it I am not a framing carpenter and I don't need a chisel that I can pound on with a hammer all day long, though I suspect that these chisels may hold up quite well under more stressful situations.
    The balance of these chisels for my technique is very good to excellent granted but chisels require a different hand hold and slightly different technique than bench chisels, but I found that they performed quite well and for what I paid for these there was no expectation of this. All in all i would give these 4.5 stars for fit finish and balance - with respect to the price range.

Sharpness out of the box

    Right out of the box these are sharp enough to do SOME basic chisel duties, for basic rough work they can be put immediately into service. My personal opinion is that they would really benefit from a nice back flattening and honing of the edge, which is something I think almost every chisel needs before you use them seriously. I did some test cutting on spruce and hard maple and these chisels faired well with the factory edge, I will be interested to see how well they keep an edge after fine sharpening.


Feathering

    After a bit of use on several boards I became more and more impressed with the feel of these chisels and begin to see some true potential in them once properly setup. All in all I think these are really good chisels for the money.

High quality for lower price

    After using these chisels for some time my final opinion is that these chisels are a great value for the price. They hold an edge well and they sharpen well, great balance for but chisels and the fit and finish is better than some of my higher end chisels. I think with a little bit of TLC and quality time with some wet stones, and these are just as good as any chisels I own. I love the handles and the storage box is nice enough. These have become my go to chisels when I need something smaller than a bench chisel and I enjoy using them each time I do.
    If you are looking for a good set of but chisels for a great price I don't think you could go wrong with these Wood River sets.

Monday, June 17, 2013

Removing wood from heel graft area

    Heel grafts are so important to the overall scheme in the guitar, because this specific guitar is colonial themed, I will be applying a one of a kind arrow style inlay to hearken back to the period. In the above picture you can see I have laid out my shapes and am in the process of removing the curly maple down to the bare mahogany tail block. Good quality sharp tools make this job a pleasure to do, without them I may as well set everything aside and go into the back yard and find a tail to chase. Because I use so many hand tools in my lutherie process, I am aware at all times of the need to keep my tools sharp and ready for work. A good set of chisels and a Japanese style back cut saw are the main tools used in this process, that and some imagination and your hands which are your most important tools of all and come with no warranty or replacement program.

Cutting and fitting inlay
    I decided upon curly KOA wood to bind this guitar with thin black white black purfling, and some bold black white black purfling. The arrow head will be an exceptionally curled specimen of flamed maple and the shaft of the arrow will be KOA and the entire inlay will be framed in KOA so that the arrow appears to be splitting through the pieces of wood. On the table behind the work you can see that I have started the arrow shaft.

Arrow shaft design taking shape

    I will have to split the maple arrow head right down the center to accept the purfling running from the arrow shaft inlay. There will also be purfling running across the bevel seen at the end of the shaft. This is extremely detail oriented work and one of my favorite parts of building guitars. Inlays, rosettes, bindings, all things which can become a luthiers signature touch upon his work and are some of the more artistic aspects of lutherie.


beginning the fit of the arrow head and shaft


Marking out the cuts
 

    Once all of the cuts are marked I pull it all back apart and make my cuts and refit several times until everything lines up perfectly. I use a lot of thick CA glue when applying the inlays and thin CA glue to weep in from above after sections have been glued in. I love watching these grafts take shape, there is never a dull moment.


Preparing the ebony


    Because I exclusively use real wood in every aspect of the guitar, aside from carbon fiber in a few key places, often I must cut thin slices from large chunks of the wood I wish to work with. Ebony is a fairly hard wood and it works good, but it can cause a person some grief especially when working in thinly sliced pieces for inlay work. I will cut the slices from this section of ebony pictured above with my backsaw. The pieces will fill the voids on either side of the arrow shaft and add a striking juxtaposition to the surrounding woods. In a way it will also organically tie in the ebony bridge and fret board to the grafted end cap area.

    Unfortunately life calls me away for the day so stay tuned to see the heel graft inlay completed and the binding applied to the cutaway and neck block areas.
 

Thursday, June 13, 2013

In the vines

    Colonial era décor is sometimes ornate to the point of gaudy at other times it is simple and elegant sometimes almost barren and sparse. I was truly inspired by the many stylized vine details throughout much of the period pieces that I have studied and decided to add that aspect into several key places. After chisels and scrapers and other arcane but effective means of reducing the bracing while tap tuning the soundboard, I discovered I needed to loose a little more mass from the braces, so it was a natural place for me to begin adding some of those details. The main sound port on this guitar will be on the shoulder of the top bout facing the player, so looking down into the guitar as it is played will give a stunning view of the hand work put into these braces.
    I have found by doing these carvings I can control the stiffness of individual areas of the brace itself without effecting its stability since the carvings do not cut deeply into the meat of the brace but rather gently caress the top layer. So by moving the vine pattern slightly closer together in one section or by spreading it out in another attaining fine tuning of the brace is easily achieved, well easily considering the amount of time it takes to hand carve each individual aspect of the vine pattern. Besides the Colonial Grand Symphony is not just any guitar, it is meant to be a work of art that hearkens back to an era as well as a fine musical instrument. It is also my endeavor to utilize all of my accumulated skills on one project, this is something I have wanted to do for some time and I must say that I am enjoying it so much that I will most likely continue in this highly detailed themed instrument journey that I have embarked upon.
    Thus far for some reason my mind keeps drifting to those beautiful hand carved muskets and Kentucky rifles with flamed maple stocks and ornate inlays of silver and brass. It seems to me that these rifles epitomize the elegance and beauty of the craftsmen in the Colonial era and much like the guitar they were tools meant to be used, they had a specific duty and a purpose. My thoughts have also drifted to the Japanese swords of ancient past, yet another stunning work of art that had a brutal and specific purpose. I suppose this is the inspiration for these new themed guitars, I am seeking to create works of art that excel in their intended purpose of being musical instruments without becoming useless wall hangers or glass case jewels.
    Anyone can make a sword, well almost anyone can, but few people can match the beauty elegance and the function of a sword made by a master sword smith in ancient Japan. And although technology has made the musket loading rifle of less use, they were very competent weapons as well as elegantly designed works of art. So in the tradition of these great masters of their trades I seek to pay homage to them and humbly walk the path they laid down to combine all of my artistic abilities with the essence of a truly fine instrument.
   
Vines close up - much finish work to do yet
   Time is an ever turning grinder that eats away the days and years and it seems to me that my life has flashed by without so much as a whisper. A very wise person once told me, time is the only thing you can not get back.. so make use of it the very best you can, in essence make the most of every moment you have because you will never get that moment back. For me life has been kind and cruel, happy beyond measure and sad beyond explanation, exciting, dangerous, thrilling, crazy, insane and wonderful and I wouldn't have it any other way. The water in the oceans rise to the heavens and fall back to the earth as rain, though they travel back down to the ocean once more they will never again be that single drop of rain, ever again. So as we plummet down to our final days we should embrace what we are and feel the wind in our faces and smile knowing that we shall not pass this way again.
    In my journey I have found what I love to do and I am blessed to be able to do it but it did not come without loss or hardship just as everything worth while does.
    Enough philosophy for the day, I have not had a chance to take pictures of the geometry of the top and back yet, so I will save that for the next post. Until then, enjoy your evening and remember to smile often laugh when you can and keep looking for the purpose in your life.
Go Bar system

    The humidity the last few days has kept me from progressing, but at last I am back at it. I think it would be a good time to discuss glues and clamping setups. I am very traditional when it comes to glues and clamping, the reason is simple, it works. Traditional hot hide glue is my go to glue for most of the construction of the guitar and the go bar clamping has so many uses that I would not be without it. If you decide to become a luthier at any point in your life invest in a good go bar system and a hide glue pot. Many of the tools I have in my studio I could probably live without, but these two things are pretty much indispensable. I can not number the times that I have had some odd part that clamping with anything else would be nearly impossible without extreme jigs and strange clamping arrangements, the go bar deck does everything. There are only a few steps in the creation of a guitar where the go bar can not be used, purfling/binding, kerf lining, and perhaps the fret board (though I believe I have even used it for that at least once!) for every other process in the glue ups the go bare is my "go too".
    Go bar decks are a fairly ancient technology utilizing flexible strips of wood, or in modern times fiberglass rods, that evenly distribute the perfect amount of pressure for nearly every joint you can think of. I have not been surprised walking into a few boutique cabinet and furniture shops and seeing massive go bar decks. They are relatively inexpensive and can replace 90% of the clamps a person owns, much like good planes and scrapers can pretty much replace sandpaper.
     Hot hide glue has been the premier choice of luthiers for over 300 years and if those beautiful violins violas and cellos can attest to its staying power and tonal abilities it is safe to say it will be around a very long time to come. Hide glue is reparable with a simple heated knife, because heat reactivates the glue, it is stronger than the wood it is holding together, it dries to a crystalline structure that transfers sound better than any modern glue I have tried and it is long lasting because you make your own. There is a bit of investment when you first start out as a good glue pot is not cheap, though a person can get by with a double burner as long as they keep constant watch on the temperature, for me the glue pot makes too much sense not to use it. 1 pound of glue can last me a very long time, and the batch I make up can last me weeks of heating and cooling and reheating because it never really goes bad, if too much water evaporates from the batch I made up (usually less than an ounce) I just add a little water.
    The glue I use is over 250 gram strength, which is not the easiest to work with. Usually I shoot for 316 gram strength because of its high shock resistance and durability but it sets up so much faster than the lower gram strength glues like the common 165 gram strength you can get at most luthier supply stores. The cost of all that extra strength is being very proficient with your glue setup and pre fitting everything before the glue comes out of the pot. 165 is sufficient for most parts of the guitar and for the beginner it is much easier to work with because its set time is a fair bit slower than the 316.
    In any case hot hide glue is my number one choice for 90% of any guitar build, the exceptions being binding and purfling (I like to have a bit more time to work with these areas) and when I utilize carbon fiber components inside the box, for the carbon fiber two part epoxies work the best. If you have not tried it yet, do so. You will find a new dimension of sound from your instruments.


Bridge plate being installed
    I will take a moment to explain my thoughts on bridge plates, simple little complex things that they are. I used to use maple and rosewood plates and they were ok, though I never liked the sound of the guitar with either of those woods attached. To me it never made sense to put two different kinds of woods together that expand and contract at different rates with humidity changes. In the last few years I have moved exclusively to a pin less design with my bridges, which has freed up that area for experimentation. I started using spruce with a small thin reinforcing strip of carbon fiber not long after and the improvement to the sound was astonishing. I run the spruce plate with opposing grain, much the way the back strip reinforcement is done to allow for the stresses of the torqueing and twisting of the soundboard without losing integrity. The spruce plate with the carbon fiber reinforcement is actually about half again lighter than the bridge pins and rosewood plate setup, and it is actually stronger.
    In the picture above the carbon fiber is not yet installed, it will run across the section where the bridge pins would be located normally, which leaves me the option to do a pinned bridge if a customer requests it without changing the tone I have worked so hard to achieve. The carbon fiber will never tear out or wear down like rosewood or maple or any other wood for that matter and you still get the benefit of all that beautiful wood sound.

    I have not had a single failure to date with heavy strings pinned or non pinned heavy and light players and everything in between so until I find something that sounds better and is this strong and light, this is what I will use.

    Next time I will be getting into more of the geometry of this particular guitar and how unique it is compared to normal guitars, though it is subtle and your eye may not catch it unless pointed out to you. I will try to get some pictures explaining the geometry and why I have chosen it for the Colonial Grand Symphony project. I will also be discussing the next few steps in the process so stay tuned, until next time... Joseph Vallis
    

Tuesday, June 11, 2013

Long into the night

    Some may say it is an obsession, others may admire it and some never seek to attain it for me it is just a labor of love. I have found that working into the night hours after the sun has faded from the windows, has its own appeal. For one my old lamp gives me a certain view of the wood that I may not get in the more glorious brightness of the day. I can play with the angle of the light to see small imperfections that cast a shadow and leave some kind of registration seen in variances. Is all of this necessary to make a great instrument? probably not, but my sense of time slips away when I am "In the zone".
    For me lutherie is not a job, not a career or even a hobby, it is my essence and the total sum of all that I enjoy. Art, music, woodworking, hand tools, perfection.. for me this is not about the amount of hours I may spend in any given process. I can do nothing else, making instruments is my calling and I embrace it with everything I have.
    When an artist paints upon the canvas, is it time that matters? Is it not the art itself that matters most of all? My goal first and always is to create the very best musical instrument that my hands heart and mind can offer, but intricately woven into that tapestry is the beauty of every single part of the whole. In my mind and heart they are inseparable. Can a great sounding instrument be constructed with imperfect parts? Of course it can, instruments are organic things and everything combines to produce the sound we hear coming from them. To me and my process the two always go hand in hand. I make better sounding instruments when I have painstakingly done everything I can on every single aspect of the instrument.
    Though there is something to be said for intuition and natural talent. The very first guitar I made though it was not perfect in every aspect, sounded beautiful. I don't know why but achieving a certain sound is something every luthier does instinctively at least at some point in their journey. It is much like the cup of coffee theory, some people can make the most amazing pot of coffee using the same pot and ingredients as someone else who makes a terrible pot of coffee. I have often pondered this thought and why it may be, there are people who have made coffee in my personal coffee pot using my beans and grinder using the exact measurements that I use and the taste is just astounding.
    So why is it that some things are just better when done by certain people? is it something in the chemistry of the person? some strange exchange of protons and neutrons? we may never know. One thing is certain though, when we find the one thing that we do exceedingly well, it gives our life meaning and purpose and the fulfillment of all those combined genes and handed down talents and skills coalesce into the achievement of a lifetime. That is why there was only one Pavarotti, one Stradivari, one Michael Angelo and only one of you. Each person has a wealth of beauty within themselves if they can only find that one true voice and follow it with all their heart. For me building guitars is that one and only calling.
   
    The process of creation is for me the equivalent of a moral cause and I embrace it completely. It does not matter if it takes days and nights and weekends and holidays and everything in between, or how many times I may have to redo something, I will do it until it is as perfect as I can make it.

    Long ago I threw all the accepted thicknesses and dimensions of every aspect of guitars out the window, and it has freed my mind to listen to the wood and feel my way through the process. There is nothing wrong with following accepted guidelines in top thickness and bracing size shape and mass, using traditional measurements will get you there and what you make will sound like a guitar (hopefully), but unless you are lucky it will not be the very best guitar it could be. Every single piece of wood, even two pieces of wood cut from the same tree right next to each other will sound and act differently. Wood is organic and sound is organic, it cannot be trapped into a prescribed and accepted ideal of what is the perfect thickness for a soundboard or other such nonsense. For instance to bring out the most from one piece of wood, you may have to thin it to the point that it structurally is weakened and more mass is shifted to the braces for structural integrity, and another piece of wood may revel in being thick and chunky and so lighter braces can be used. But it goes even deeper than that, along the structure of the wood fibers certain dead zones exist where sound travels through the fibers and hits a wall of resistance. The only way to detect those spots is by running your ear along the entire surface of the soundboard as it is tapped. Trust me if you have a good ear you will hear the "dead zones" quite clearly.
    So how does one deal with these zones of impeded sound? it is different in every single piece of wood and in each dead spot on that same piece of wood. I have found in some cases a simple small razor line scratch either across or along the grain of the wood can often change the dynamics of that dead zone and bring it back to life, where in other cases thinning the area in question brings out its stifled voice. In other instances a slight thinning around the dead zone will push it into a sonically pleasing place.
    The point is not that a person has to do all of this to make a great sounding guitar, and to most ears all of the effort may go somewhat unnoticed. However as subjective as sound and tone may be, there is a certain richness and vitality to a truly tuned and responsive soundboard.

    As I said some may call it an obsession, I just call it life. In the end I can do only one thing and that is to live the life that I was born to live, as a luthier.

Saturday, June 8, 2013

Well Bracing it is...

    First off let me just say that bracing is probably the blackest art in the trade of lutherie and not a subject that could be covered in one blog or maybe even 100 blogs. There are so many patterns and styles of bracing that one could literally go insane studying the theories and applications of the concept. I have many different styles I have used in the past from lattice bracing to traditional X bracing to my own hybrids and to be perfectly honest, no matter what bracing you use on the soundboard, the thing will still sound like a guitar. Be that as it may, some bracing patterns can give you certain tonal qualities that others can not.
    I approach bracing very traditionally in one regard and quirky and eccentric in others. Lately I have been playing with the prewar double X bracing patterns. There is something truly unique about the sound of a guitar made before the 1940's, and though I am very much against copying anything out there, (why would someone want to buy an expensive copy of an original?) I think the tonal characteristics of the double X style bracing brings a classic dimension to modern guitars. Though I shave my braces down to get the sound I am looking for the rear portion of the bracing is similar in some regards to the old double X.


Double X bracing
    The above picture shows the beginning stages of this pattern, the main cross braces that form the larger X are actually double arched in an over under pattern. Since I do not allow contact of the finger board to the sound board and there will be no traditional sound hole on this top there is more freedom to use more open designs that allow the top to reach better levels of acoustic reproduction of the strings. The back X is similar in "over under" design without the arch in the base side tone bar, instead a round shouldered rectangular notch is used. The difference in the back X is to allow full contact of the two tone bars for gluing. This top will not be under the same stresses as a normal steel string guitar due to the removal of the sound hole and the loss of downward pressure from the fret board, combined with the extremely stiff master grade bear claw spruce it leaves me a lot more options.
    Since most acoustic guitars are pretty much "dead" from the sound hole forward a great loss of volume and tone occurs. It is probably the most inefficient acoustical design ever devised, but it has somehow made it through many years with little change. Removing the greatest week spots from the most important part of the guitar, gives you the chance to take full advantage of that big rich beautiful piece of wood and to use new and possibly amazing bracing patterns.
 
"Over Under" design
 
    Ultimately all of these surfaces will be scraped down to a glassy smoothness to facilitate better airflow and better sound quality. The upper bout will have another X brace once the area for the cutaway has been established, I am calling it "Cascading X" bracing as the X pattern will run from the top and cascade to the bottom. While the braces are roughed in at this point there is still a lot of work to do in shaping and tap tuning.
    I think this particular piece of spruce is one of the finest pieces of wood I have had the pleasure to work with. When it is tapped it rings like a bell and the sustain is just incredible. Considering I have not even brought the top to final thickness or shaved very much from the braces yet, that says volumes in what this top is capable of. The stiffness on this soundboard is literally phenomenal compared to anything I have worked with before. Bear claw spruce is by all accounts much higher in the stiffness to weight ratio across the many spruce varieties, but this one is truly out of this world. I think I could hang a house off the end of a 1" wide 24" long piece, ok that's an exaggeration but still it is an amazing piece of wood.  
   
Bear Claw Figure


    The photo above shows how much figure there is in this top, and it runs through the entire face only slightly diminished in the center. I used to have mixed feelings about bear claw spruce, but as I listened to more guitars made with it, and started to use it myself I found that I began to love it. At first it was the tone that captured me but later I came to love the look of the bear claw figuring as well. I suppose like many things the more you do something the more your tastes change over time and with much experience.
    While I designed the theme of this guitar as "Colonial" in nature, I wanted to showcase the amazing domestic woods that America has to offer. Maple is a great tone wood especially for larger guitars like this Grand Symphony size body and bear claw spruce has unmatched tonal characteristics (especially this particular piece). Together they should bring the sound and style that that I hope to achieve with this instrument.
    Some inspirational photos for design features... All photos courtesy of respective owners.

Maple stock Musket
Colonial Era Pipehawk


Colonial Era Table


    Perhaps the discerning artistic eye will be able to envision the possible outcome of this endeavor and all the ways it can possibly take shape. Wood is an organic thing just as true sound is organic, always moving always changing never static or the same. I build instruments by hand because I believe in my heart that when you are in contact with every piece of wood "listening" to it and feeling your way through the build you end up with an instrument that is organic by nature and symbiotically sympathetic to the gentle guiding of the luthiers intention. It is a little known fact by most laymen that the most beautiful sounding and looking instruments in the world, the Stradivarius Violins and Chellos are not symmetrical. In fact Stradivari was a genius with his hand tools and most likely could have created instruments of almost CNC precisian if he wished but he did not because he understood the aesthetics and the sound of something that emulates nature and flows organically. Wood will only be stressed so much, tweaked, prodded and coaxed into shape so many ways before it finally loses its ability to hold up. If you run ten thousand pieces of wood through a CNC machine to get perfect thickness uniformly and perfect dimension in all ten thousand pieces, not a single piece of wood will sound the same. Worse mass produced "standard" thicknesses mean nothing in the real world where each piece of wood is different and each needs different thickness to achieve its best sound and strength as decided by the body design and string gauge.
    But I digress, at the end of the day mass produced guitars fill a need for somewhat inexpensive instruments for daily players and that is a good thing. They are the milk of the instrument and eventually some players grow out of the milk and move onto solid food of truly unique custom hand made guitars that give them one of a kind sound, look feel and function.
    Stay tuned for more to come soon!